Upgrading My Home Network To Fully Leverage My Fibre Internet Connection
Since I reviewed the ASUS RT-BE86U and discovered how fast it was at routing traffic to and from the Internet, it made me think that I could use it improve my connection to the Internet. You see, back when my ISP of the moment was Bell and more recently with Distributel, I’ve had issues maximizing the speed that I was getting from my Internet connection. With Bell I had to bypass their hardware using some really complicated methods to do so. And when I moved to Distributel, I suffered from the PPPoE speed limitations of the hardware that I was using, which was the ASUS ZenWiFi XT8.
I started to research how I could do this in a cost effective manner because after all, networking gear is expensive. After some research, I soon came up with a way to leverage my existing ZenWiFi XT8 gear while using the RT-BE86U at the same time. Let me lay it out graphically for you and then go down the rabbit hole in terms of my logic:

My plan was to use the RT-BE86U as a pure router. As in turn off its WiFi 7 capabilities. Because that would give me 1 Gbps downstream and upstream from the Internet which is something that I do value. Then use the existing Zen WiFi XT8’s with their routing functions turned off to deliver WiFi in my condo. Now you’re likely wondering why I would use a pair of WiFi 6 mesh routers to deliver WiFi. The fact is that the fastest device that I have in my home from a WiFi perspective is a M2 Pro Mac mini that does WiFi 6E. And while it is capable of maxing out my Internet connection on WiFi 7, only having one device that is capable of doing that doesn’t justify making the switch to WiFi 7. Also, while WiFi 6 devices would see a speed boost if I made the switch to WiFi 7, I also value stability above all else. And I knew that this setup works with everything that I own. The final point that I would like to make is that this sort of setup is what I do my business and enterprise clients all the time and is proven to work. Which is to have a fast router connect to the Internet. Then install access points wherever they are needed with an Ethernet backhaul to the router. Though I am deviating from that in my use case. While I have one XT8 connected via an Ethernet cable. That XT8 is communicating to the second XT8 via a wireless backhaul. I’m doing that because I have never been able to run Ethernet cable in the walls of my condo as they are solid concrete. Thus a wireless backhaul setup from the point where my connection to the Internet terminates to the far end of my condo is the only option that is available to me.
Another factor in my decision to go this route is that it leaves open the option of using the RT-BE86U as the base for a mesh setup in the future as it supports the Ai Mesh feature. For example if I wanted to switch to WiFi 7 in the future, I just have to buy a second ASUS WiFi access point or router and add it via a few clicks to the RT-BE86U to create a mesh network. But at the same time I also have the option of doing the WiFi 7 version of what I am about to describe which is to have a pair of mesh nodes set up as access points only. Finally, the fact that I can repurpose the networking gear that I already own to make my network better means that something that I spent a lot of money on doesn’t sit in a box unused while you try to sell it on Craigslist, or worse it ending up as eWaste is a big win for me.
The first thing that I had to do is to configure the router to connect to Distributel via PPPoE. That was easy enough as I had already figured that part out with the XT8’s. Thus I carried that configuration over to the RT-BE86U router. The one issue that I ran into is that I could not get this working on the RT-BE86U’s 10 Gbps Ethernet port when I plugged it into the Nokia ONT (Optical Networking Terminal) that was supplied by Distributel to in layman’s terms convert fibre to Ethernet. But it worked perfectly fine on the 2.5 Gbps port. I found that unusual because the Nokia ONT is at least on paper capable of doing 10 Gbps via Ethernet. I really didn’t go too far down the rabbit hole on this as I have a 1 Gbps downstream Internet connection which meant connecting the ONT to the RT-BE86U’s 2.5 Gbps port is fine. But it was clear that the Nokia ONT and the RT-BE86U couldn’t negotiate a stable 10 Gbps Ethernet connection for reasons that I could not discern. Thus it’s a good thing that the RT-BE86U gave me another option to make this work via having a separate 2.5 Gbps port. And on top of that, I now have a 10 Gbps for the LAN should I need it in the future.
Once I confirmed that I had stable Internet access, I went about locking down the router. Which means doing the following:
- I disabled UPnP for the reasons I outlined here.
- I also disable WPS for the reasons outlined here.
- I never use any sort of cloud management for the router nor do I expose the admin page to the outside world as those are great ways to get pwned by hackers.
- I make sure that the firmware of the router is up to date.
- I use a third party DNS service rather than my ISP’s DNS service. At the moment, I am using Quad9 as that blocks threats at the DNS level. And my ISP doesn’t get to monitor my browsing habits and sell that data to third parties.
- I disabled PING, Telnet, SSH, and HNAP to make sure that the router isn’t accessible or seen from the Internet.
I then penetration tested it and declared it to be secure. Or at least as secure as I can make it as nothing is ever truly secure these days.
I also turned on the Trend Micro AiProtection feature as I have found over the years that it is effective in terms of keeping my network secure with no noticeable impact to the speed of my network. Now for full disclosure, it does send data to Trend Micro, but I wrote an article as to why that’s a total non issue if that is a concern.
So with that out of the way, I moved onto reconfiguring the XT8 nodes. Prior to this project I had the XT8 nodes set up with one being the router and primary mesh WiFi node, and the other one as a secondary WiFi node connected via using the second 5 GHz band as a dedicated wireless backhaul. Meaning that this 5 GHz connection does nothing other than provide bi-directional communication between the nodes. The first task was that I had to turn off the routing functions as there was no need for these to do any routing, and turn on what’s called access point mode. Meaning that these units are simply access points. To do that, I followed these steps outlined by ASUS which are mostly clear and require you to first factory reset your router. But one thing that I would like to point out is that when you put the nodes in access point mode, the 2.5 Gbps ports on each of the XT8 nodes become uplink ports rather than being WAN only ports. That’s something that this documentation doesn’t make clear and I only found that out when I was doing some testing with this configuration. Thus I used the 2.5 Gbps port on the first XT8 to connect to one of the 2.5 Gbps ports on the RT-BE86U to make sure that I was getting the highest possible speed from the router to the first XT8 node. The other thing that I found is that even though the first XT8 unit got an IP address from the RT-BE86U, I couldn’t access it over the network to do the initial setup. Instead I had to connect to it directly via WiFi to do that. Which didn’t match what the instructions from ASUS had online. Regardless, I was able to get them set up in access point mode. And what was interesting is that both nodes automatically configured themselves. Which is another deviation from the instructions that ASUS provided. I am assuming that this is due to the fact that the XT8’s come pre paired from the factory. Now to be fair to ASUS, the instructions used a scenario that involved a different product and not the XT8. But if I could offer ASUS a piece of advice, they should consider rewriting their instructions to cover a wider variety of use cases.
Pro Tip: When you get to the part about selecting an automatic IP address or manual IP address, always choose manual and pick an IP address that you can remember and document. That way you know what IP address the unit has so that you can log in and do firmware updates or tweak something.
Once I confirmed that everything was working with the XT8 nodes with their factory configuration, I next had to enable the wireless backhaul. That required me to turn on a feature called “Smart Connect” which combines all the bands into a single network that you can see rather than having a distinct 2.4 GHz network and 5 GHz network. But at the same time it turns on the wireless backhaul feature. One I turned it on I had to let the XT8’s reboot, and then turn “Smart Connect” off again which leaves the wireless backhaul feature enabled. ASUS could have made life easier if they split out the wireless backhaul feature from “Smart Connect” as turning on an unrelated feature and then turning it off again to turn on the feature that you want is a bit “janky” as the kids say, but this was only five minutes of time spent to do this so I am not complaining.
Sidebar: The reason why I don’t run “Smart Connect” is that I find that routers that combine the bands into a single network sometimes have issues with devices connecting. By separating them out, I completely avoid that problem. But I will admit that I will have the rethink that when I eventually move to WiFi 7 as part of the reason why you get the crazy speeds that WiFi 7 offers is by having this feature turned on.
I then put in all the tweaks that I have done over the years to make everything from HomeKit devices to specific devices like my wife’s ChefSteps Joule work properly over WiFi. That was a trivial exercise as I had documented all of that up front. Which by the way is something that you should do before embarking on an exercise like this. After that, I turned off the ability for all this hardware (meaning both the XT8’s and the RT-BE86U) to automatically receive firmware updates. To be clear, I do update the firmware on all my gear as firmware updates often bring security fixes and improvements that should be rolled out a soon as possible. But I do it on my schedule so that I don’t wake up one morning to no Internet access or some other weird network issue such as this situation from a few years back.
The second to last step was to shut down WiFi on the RT-BE86U as I would have no use for it. At least not today. This document from ASUS will help you to do that. And the final step is to save the configurations of both XT8’s and the RT-BE86U. This document from ASUS will walk you through doing that. That way if I needed to swap out hardware or I needed to put something back to a known good configuration, I could do that without a problem.
I’ve been running this for a number of days, and while I have not noted any dramatic differences, I can say that there are some “marginal gains” to borrow a phrase from Dave Brailsford (backstory on “marginal gains” here). I do notice that when I do VPN sessions to clients, that those sessions are consistently more fluid. I also notice that MS Teams and Zoom meetings are also a bit more fluid and natural feeling. As for why, one possibility is that my upstream bandwidth went from this:

To this:
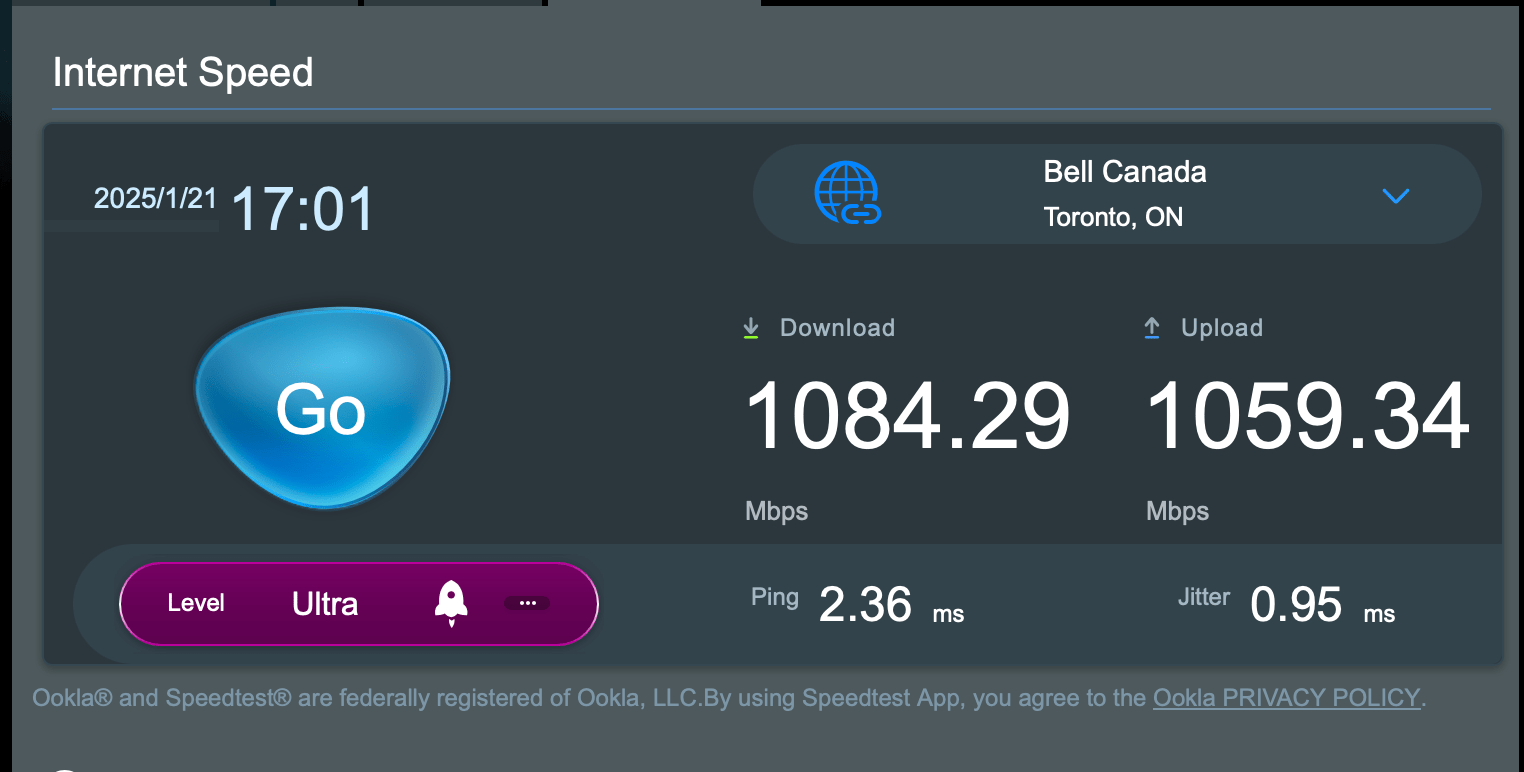
It is also possible that the fact that the RT-BE86U is much better than routing versus the ZenWiFi XT8 was could also be playing a role as well. Or it is both at the same time. Or perhaps it’s something else that I am not able to discern. Without going into the weeds to figure it out, it’s hard to say. But I will take any improvements that I can get, no matter how marginal. One thing that I have to say is that I am paying to have 1 Gbps downstream and 750 Mbps upstream from Distributel, and I am getting more than I am paying for by making this change which is great.
Do you have any questions about what I’ve done here? If you do, leave a comment and I will be happy to answer them as doing this was a win for me, and it might be a win for you as well.
June 20, 2025 at 8:45 am
[…] frequent readers of this blog will be aware, I recently upgraded my network to fully leverage my fibre connection with Distributel who is my curr…. By putting in a better performing router, specifically the ASUS RT-BE86U, I was able to get my […]